
How about screenshotting on the Chromebook you use now, not just the phone?
Or that you no longer have to take a screenshot on your phone and then transfer it to your computer because it can now do that on its own?
Isn’t it great? But wait, that’s not all!
Answers to some questions we’ll look at next, like ‘How to take a screenshot on a Chromebook?’ Will make your life easier in ways you may not know about.
After all, most of us know how to take a screenshot on Android or iOS, but this is something new!
All you have to do is trust your guide here and follow what you read!
What is Screenshot on Chromebook?
In earlier times, you could only take screenshots, either using keyboard keys that you don’t remember or basic tools that have their own limitations.
but no more! Chromebooks come with an excellent tool that helps you not only take a screenshot of a page but also screen-record a video and save both as files for future reference. So let’s take a look at how to take a screenshot on a Chromebook.
Chromebook screenshot and screen record
A screenshot on a Chromebook, like on a smartphone, is an illustrated snapshot of whatever is happening on the screen at that moment. It helps you take visual shots or record content, including any images, video shots, or text that may be available.
It’s like ‘exactly what you saw’ while you were working on it. It not only helps you as a student or an employee but is beneficial in every field of work in innumerable ways.
Let’s see how!
How can Screenshot on Chromebook help you?
A screenshot on your smartphone is something you do every other day, and it helps so much that it gives you time later.
Yes, of course, apart from blackmailing your friends for their ugly pictures!
Now that you know a lot about screenshotting on your smartphone, here are the top 4 ways in which Chromebook screenshots can help you in your daily life:
- Take screenshots of the pages you are browsing in case you encounter any technical glitches or issues.
- Build a research portfolio with examples from other sites.
- Build a team strategy based on the findings on competitor site pages.
- Give a better explanation to your teammates by presenting a more graphic view of what you really want your project to look like.
One of the other highlights of this tool is the ability to record the screen and then save it as a video. You can edit, view and save all those screenshots and videos to use later.
There are many other additions to its uses, so many that I may not be able to list them all here!
So instead, let us just try out the feature for ourselves and get on with how to use it!
How to take screenshot from keyboard on chromebook?
Starting from the beginning, let’s learn about keyboard shortcuts you may have forgotten over time.
Here’s what you would do to get the Screen Capture toolbar working:
- press keys Shift + Control + Show Windows overall. so that you know, the show windows The key is placed in the top row with the same icon as the actual window.
- Now you will see a toolbar at the bottom of your screen.
If you want to take a screenshot of the entire window screen of your PC, you can simply press the button Ctrl + Show Windows keys together.
However, these key shortcuts will only help you take full window screenshots. Also, you need a keyboard to access the said keys.
So, tablet users or those who want partial capture of the screen, let’s see what you can do next.
Steps to take a Chromebook screenshot of a specific area
Sometimes, you want a screenshot of the specific area you want to use. So instead of taking up extra space in capture, follow these steps to capture what you need.
- Squeeze Shift + Control + Show Windows key, and you will see a box appear on the screen.
- The box shows the area being captured. To select a specific category, you can drag Accordingly on the top, button, left or right.
- Once done, release your mouse and save the new screenshot.
If you use a tablet, you can see the next process in line.
How to take screenshot on chromebook in tablet mode?
A convertible device like the Google Pixelbook i7 may not have access to physical keys, and so you can use another option to screenshot your page on a Chromebook.
- Squeeze power and volume down button completely.
- You’ll see a notification that displays a thumbnail of the screenshot.
- You can view and edit it by clicking on the same.
If you have a stylus pen and want to use it to take screenshots, here’s how you can do it.
How to take a screenshot on a Chromebook in tablet mode using the stylus?
Most of the people find the use of stylus pen convenient and hence they would like to use it in the screenshot process. To do this, you need to follow the steps given below:
- Choose stylus pen that you are using.
- click on capture screen to snapshot the entire screen area, or
- click on capture area If you want a part of the area to be captured.
- In the latter case, you will see a box appear on the screen. Now move the sides of the box to cover the area you want to screenshot.
- Once done, you can take the pen off the screen and there you have it!
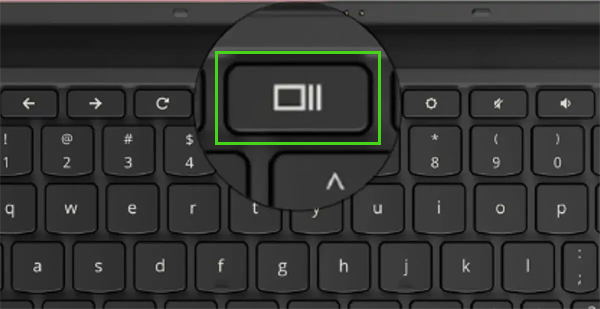
In addition, some of the latest versions of Chromebooks come with direct key For screenshot purposes.
It is again available in the top row with an icon like a camera, as shown in the image. It consists of a rectangle with a circle in the middle. You press it without making a key combo, and there’s your captured shot!
How to take a screenshot on a Chromebook from the Settings menu?
Of course I know!
You’ll forget key combinations again, and find yourself in trouble the next time you need to screenshot on a Chromebook!
But we are here to rescue.
Google has added a feature for instant screenshots quick settings Menu, for people like us! You know, we all have a hard time remembering!
All you have to do is go to quick settings menu and click screen capture options, and there you have it. Toolbar!
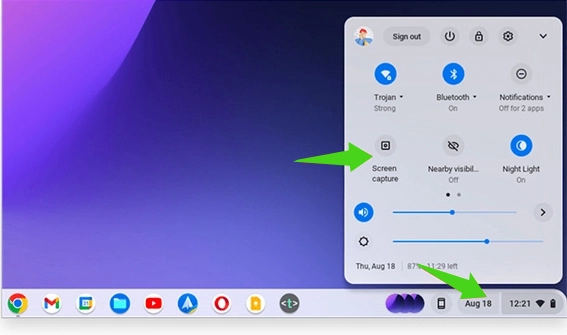
But who knows how to use that toolbar? We do, and that’s exactly what we’ll be helping you with next.
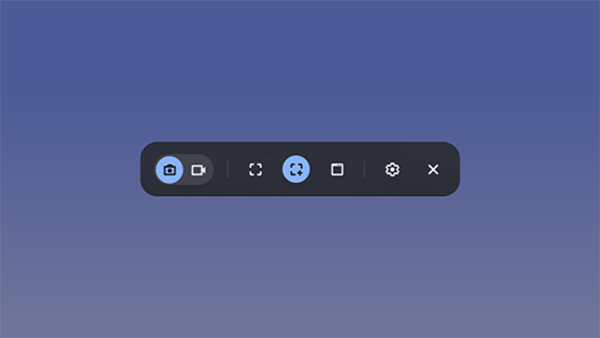
How to take a screenshot on a Chromebook using the toolbar?
If you have followed the steps mentioned earlier properly, by this time you will have a toolbar on your screen.
Now you will see the bottom toolbar divided into 3 mini sections as shown in the image.
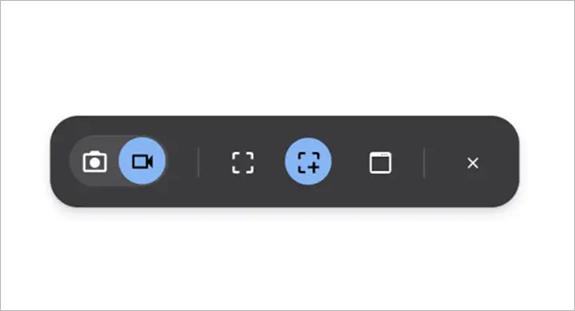
The usage of all the options in the toolbar is given below:
- The left one allows you to change your preference screenshot To screen record and vice versa.
- The middle one gives you access to either snapshot full screencomplete windowor just one screen share you would want.
- Next, on the far right, is Adjustment menu that enables you to turn on or off microphone For volume in screen recording.
Isn’t it amazing? I mean, screenshot and screen record whatever and whenever you want!
But wait!
Where is all this saved? Umm, let’s see!
How do you save screenshots on a Chromebook?
So now the screenshot of your desired screen or window has been taken, and a notification for the same is in the bottom right corner. The notification shows a thumbnail of the screenshot taken, as shown in the next image.
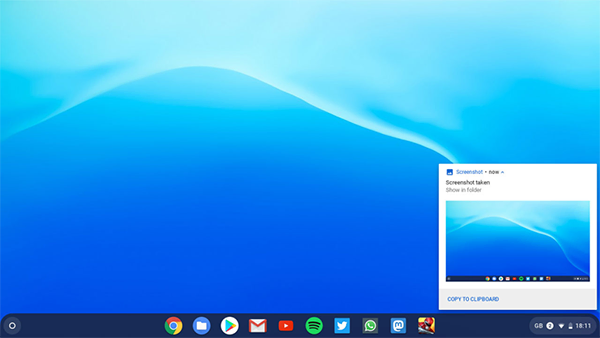
you can click on edit or view it accordingly. For editing purposes, if you know how to edit or at least crop a screenshot on Mac and Windows, you’re good to go here too!
However, if you want to save this screenshot on the cloud, then complete the given steps:
- Saved in screenshot download folder on your system. You can access them by opening the File tab and selecting Downloads.
- Now select the screenshots you want to upload to the cloud.
- You’ll see a selection bar appear in the top-right corner of the screen. Select the Share option in the same from the drop-down.
- Select the Save to Drive option, among other options including Dropbox and OneDrive.
So, hopefully, you’ve managed to ‘take’ and save ‘so many’ screenshots that you’ve always wanted to capture.
Conveying what’s on your mind during a corporate meeting won’t be difficult anymore because now you have what you really want to show off!
Frequently Asked Questions
Answer: To take a screenshot on Chromebooks, you must simultaneously press the Shift+Control+Show Windows keys on the keyboard.
Answer: If you use a device with a keyboard or keys, you can just press the Power and Volume Down buttons at once.
Answer: To capture a specific screen area in your screenshot, press the Shift+Ctrl+Show Windows keys simultaneously and drag the box across the screen. Now, only the area included in the drawn box will be captured in your ss.
Answer: To take a screenshot without using the keyboard, you can press the Power and Volume Down buttons at the same time. Also, you can try pressing the Power button for 2-3 seconds and then click Screenshot. However, if both of these solutions don’t work, you can search for help on the developer’s site.
Answer: The steps to take a screenshot differ from device to device. However, if you use a Windows device, you can press the Windows+PrtScn keys simultaneously for ss. However, if your keyboard doesn’t have a PrtScn key, try pressing Windows+Space Bar simultaneously.
Source: